Tutorial part 1 - Introduction
![]()
Tutorial part 2 - Defining a new site
![]()
Tutorial part 3 - Cache "file"
![]()
Tutorial part 4 - Remote info & upload
![]()
You can work on a (local) site on multiple computers (if each has an install of Dreamweaver) in different locations (home, work, college etc) by moving the local site (stored on a USB memory stick) between the different computers. Each computer will need an install of Dreamweaver with the local site name and location defined in it. When you insert your USB memory stick and choose your site in Dreamweaver, it will be recognised and you can continue working.
If the latest version of your site is already uploaded, you could forget the USB memory stick and simply carry the ftp details of the site with you, then on any computer with an install of Dreamweaver, create a new local folder structure and define a new site in Dreamweaver, but before you start work you will need to download the site files from the server to a local folder, which can be time consuming.
Every install of Dreamweaver can organise and oversee multiple sites, so you need to know ...
- how to create local site folder structures
- choose where they are stored on your USB memory stick or hard drive
- switch between them
- move them between computers
This article should help you.
NOTE: Screenshots shown are Mac, but the same principal applies to the PC version.
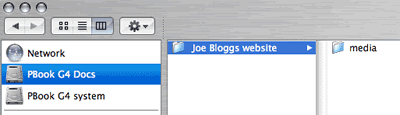
Creating a local root folder
If you are starting from scratch you will need to create a "local root folder" on your USB memory stick, portable storage device or internal hard drive which will contain all your html and media files etc.
You may also find this article on organising site files helpful.
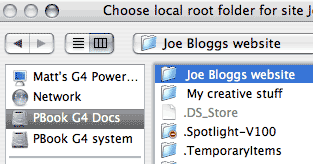
If you know how you are going to organise your files you may wish to create extra folders inside the local root folder (here we have created a "media" folder"), but this can always be done later within Dreamweaver's "Files" window.
Name your root folder something recognisable like "Joe Bloggs website". You'll be glad you did when later on you find yourself building and maintaining dozens of sites within Dreamweaver.
Define a site in Dreamweaver
The next step is to define a new site in Dreamweaver. You will need to do this for every computer you will be using to create your site. Essentially, Dreamweaver oversees and monitors all the files in your site and the links between them. You therefore need to keep them together in a folder (structure).
1. Launch Dreamweaver, and open the Files window ("F8" key).
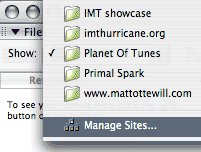
2. From the "Show" menu choose "Manage Sites". Alternatively, you can go to the top menu Site > Manage sites.
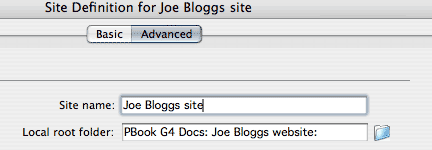
3. Click on "New" and choose "Site".
4. Name your site so you can recognise it when it appears in the "Show" drop down menu list. It is wise to name it the same as your local root folder.
5. Click on the blue folder icon to the right of the "Local root folder:" dialogue box. This will open the "Choose local root folder" window where you can select the local root folder you made previously. Select your local root folder and click "choose".
6. You can now click "OK" to close the "Site definition" window and then "Done" to close the "Manage sites" window.
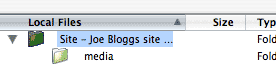
7. You should now see something like this in Dreamweaver's Files window.

Selecting your site for editing in Dreamweaver
Whenever you return to Dreamweaver to edit your site you will need to either ...
- Open the "Files" window/palette
- Choose your site from the "Show" drop down menu (you or someone else may have been working on a different site meanwhile).
... or ...
- Go to the top menu Site > Manage sites
- Choose the site from the list
- Click "Done"